Managing Python Environments
Last updated on 2023-04-20 | Edit this page
Overview
Questions
- How do I manage different sets of packages?
- How do I install new packages?
Objectives
- Understand how Conda environments can improve your research workflow.
- Create a new environment.
- Activate (deactivate) a particular environment.
- Install packages into existing environments using Conda (+pip).
- Specify the installation location of an environment.
- List all of the existing environments on your machine.
- List all of the installed packages within a particular environment.
- Delete an entire environment.
Key Points
- A Conda environment is a directory that contains a specific collection of Conda packages that you have installed.
- You create (remove) a new environment using the
conda create(conda remove) commands. - You activate (deactivate) an environment using the
conda activate(conda deactivate) commands. - You install packages into environments using
conda install; you install packages into an active environment usingpip install. - You should install each environment as a sub-directory inside its corresponding project directory
- Use the
conda env listcommand to list existing environments and their respective locations. - Use the
conda listcommand to list all of the packages installed in an environment.
What is a Conda environment
A Conda environment is a directory that contains a specific collection of Conda packages that you have installed. For example, you may be working on a research project that requires NumPy 1.18 and its dependencies, while another environment associated with an finished project has NumPy 1.12 (perhaps because version 1.12 was the most current version of NumPy at the time the project finished). If you change one environment, your other environments are not affected. You can easily activate or deactivate environments, which is how you switch between them.
Avoid installing packages into your
base Conda environment
Conda has a default environment called base that include
a Python installation and some core system libraries and dependencies of
Conda. It is a “best practice” to avoid installing additional packages
into your base software environment. Additional packages
needed for a new project should always be installed into a newly created
Conda environment.
Working from the command line
So far, we have been working inside Jupyter Lab. However, we now want to manipulate the Python kernels and will be working from outside Jupyter.
For installing packages and manipulating conda environments, we will be working from the terminal or Anaconda prompt.
macOS - Command Line
To start the JupyterLab server you will need to access the command line through the Terminal. There are two ways to open Terminal on Mac.
- In your Applications folder, open Utilities and double-click on Terminal
- Press Command + spacebar to launch Spotlight.
Type
Terminaland then double-click the search result or hit Enter
After you have launched Terminal, run conda init.
You should now see (base) at the start of your terminal
line.
Windows Users - Command Line
To start the JupyterLab server you will need to access the Anaconda Prompt.
Press Windows Logo Key and search for
Anaconda Prompt, click the result or press enter.
After you have launched Terminal, run conda init.
You should now see (base) at the start of your terminal
line.
Creating environments
To create a new environment for Python development using
conda you can use the conda create
command.
For a list of all commands, take a look at Conda general commands.
It is a good idea to give your environment a meaningful name in order
to help yourself remember the purpose of the environment. While naming
things can be difficult, $PROJECT_NAME-env is a good
convention to follow. Sometimes also the specific version of a package
why you had to create a new environment is a good name
The command above will create a new Conda environment called
“python3” and install the most recent version of Python. If you wish,
you can specify a particular version of packages for conda
to install when creating the environment.
Always specify a version number for each package you wish to install
In order to make your results more reproducible and to make it easier
for research colleagues to recreate your Conda environments on their
machines it is a “best practice” to always explicitly specify the
version number for each package that you install into an environment. If
you are not sure exactly which version of a package you want to use,
then you can use search to see what versions are available using the
conda search command.
So, for example, if you wanted to see which versions of Scikit-learn, a popular Python library for machine learning, were available, you would run the following.
As always you can run conda search --help to learn about
available options.
You can create a Conda environment and install multiple packages by listing the packages that you wish to install.
When conda installs a package into an environment it
also installs any required dependencies. For example, even though Python
is not listed as a packaged to install into the
basic-scipy-env environment above, conda will
still install Python into the environment because it is a required
dependency of at least one of the listed packages.
Creating a new environment
Create a new environment called “machine-learning-env” with Python and the most current versions of IPython, Matplotlib, Pandas, Numba and Scikit-Learn.
In order to create a new environment you use the
conda create command as follows.
BASH
$ conda create --name machine-learning-env \
 ipython \
 matplotlib \
 pandas \
 python \
 scikit-learn \
 numba
Since no version numbers are provided for any of the Python packages, Conda will download the most current, mutually compatible versions of the requested packages. However, since it is best practice to always provide explicit version numbers, you should prefer the following solution.
BASH
$ conda create --name machine-learning-env \
 ipython=7.19 \
 matplotlib=3.3 \
 pandas=1.2 \
 python=3.8 \
 scikit-learn=0.23 \
 numba=0.51
However, please be aware that the version numbers for each packages may not be the latest available and would need to be adjusted.
Activating an existing environment
Activating environments is essential to making the software in environments work well (or sometimes at all!). Activation of an environment does two things.
- Adds entries to
PATHfor the environment. - Runs any activation scripts that the environment may contain.
Step 2 is particularly important as activation scripts are how
packages can set arbitrary environment variables that may be necessary
for their operation. You can activate the basic-scipy-env
environment by name using the activate command.
You can see that an environment has been activated because the shell prompt will now include the name of the active environment.
Deactivate the current environment
To deactivate the currently active environment use the Conda
deactivate command as follows.
You can see that an environment has been deactivated because the shell prompt will no longer include the name of the previously active environment.
Returning to the base
environment
To return to the base Conda environment, it’s better to
call conda activate with no environment specified, rather
than to use deactivate. If you run
conda deactivate from your base environment,
you may lose the ability to run conda commands at all.
Don’t worry if you encounter this undesirable state! Just start
a new shell.
Activate an existing environment by name
Activate the machine-learning-env environment created in
the previous challenge by name.
Deactivate the active environment
Deactivate the machine-learning-env environment that you
activated in the previous challenge.
Installing a package into an existing environment
You can install a package into an existing environment using the
conda install command. This command accepts a list of
package specifications (i.e., numpy=1.18) and installs a
set of packages consistent with those specifications and
compatible with the underlying environment. If full compatibility cannot
be assured, an error is reported and the environment is not
changed.
By default the conda install command will install
packages into the current, active environment. The following would
activate the basic-scipy-env we created above and install
Numba, an open source JIT
compiler that translates a subset of Python and NumPy code into fast
machine code, into the active environment.
As was the case when listing packages to install when using the
conda create command, if version numbers are not explicitly
provided, Conda will attempt to install the newest versions of any
requested packages. To accomplish this, Conda may need to update some
packages that are already installed or install additional packages. It
is always a good idea to explicitly provide version numbers when
installing packages with the conda install command. For
example, the following would install a particular version of
Scikit-Learn, into the current, active environment.
Using your environment in Jupyter
We need to perform a few extra steps to make our conda environments available in Jupyter Lab.
First, we’re going to break convention and install the
nb_conda_kernels into our base environment.
Now for any environment we want to be available in Jupyter Lab we
simply install the ipykernel package.
We then want to go back to our base environment and start Jupyter Lab:
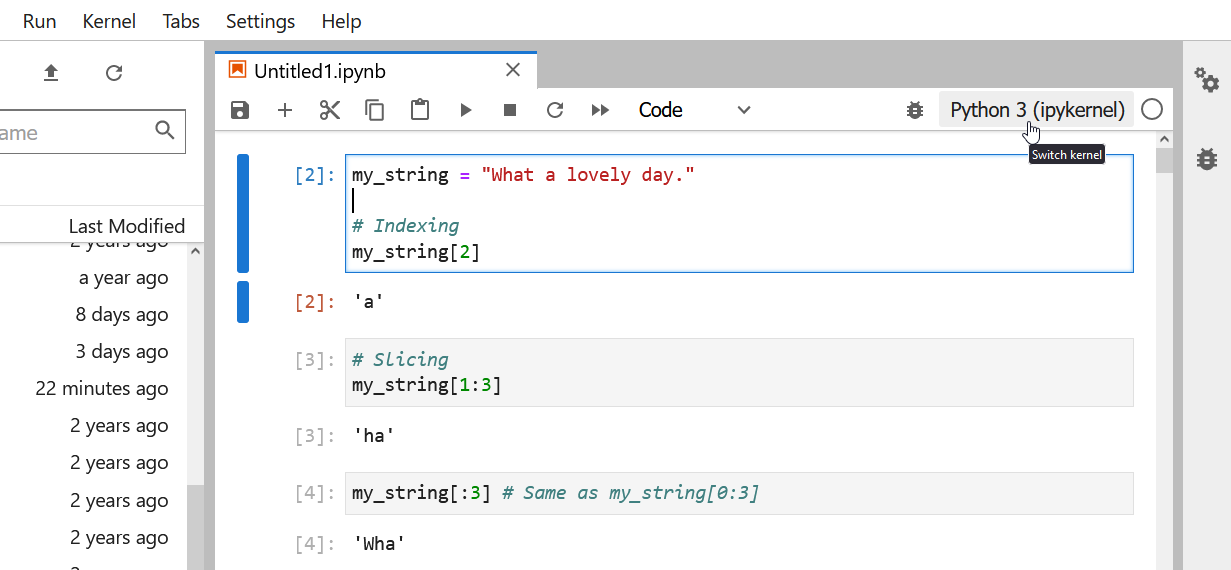
Now, when we launch Jupyter Lab our environments should be available as kernels. You can change your kernel in the top-right of the screen:
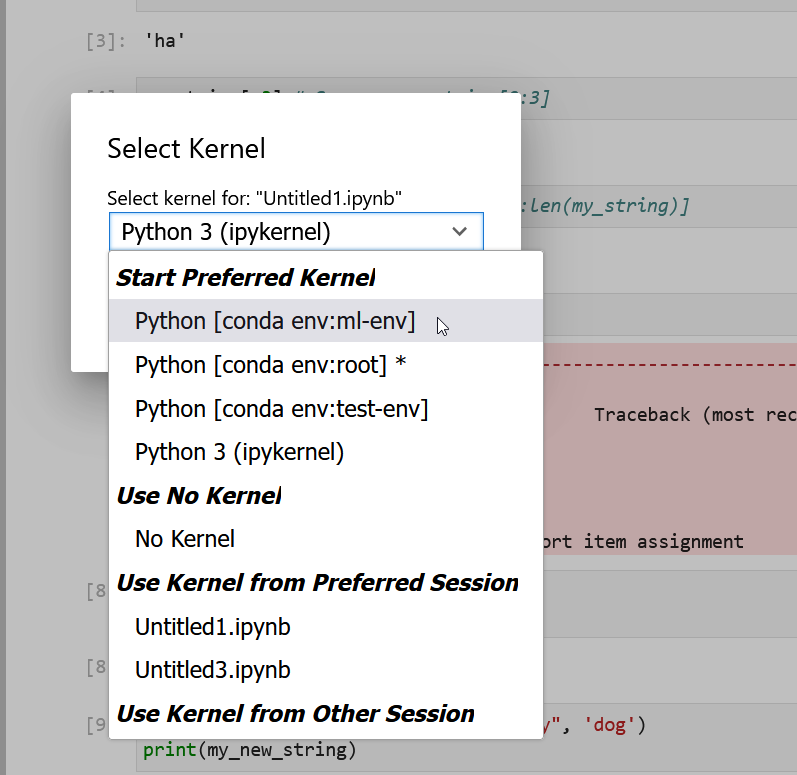
And you should see your conda environments available:
Freezing installed packages
To prevent existing packages from being updating when using the
conda install command, you can use the
--freeze-installed option. This may force Conda to install
older versions of the requested packages in order to maintain
compatibility with previously installed packages. Using the
--freeze-installed option does not prevent additional
dependency packages from being installed.
Where do Conda environments live?
Environments created with conda, by default, live in the
envs/ folder of your miniconda3 (or
anaconda3) directory the absolute path to which will look
something the following: /Users/$USERNAME/miniconda3/envs
or C:\Users\$USERNAME\Anaconda3.
Running ls (linux) / dir (Windows) on your
anaconda envs/ directory will list out the directories
containing the existing Conda environments.
How do I specify a location for a Conda environment?
You can control where a Conda environment lives by providing a path
to a target directory when creating the environment. For example to
following command will create a new environment in a sub-directory of
the current working directory called env.
You activate an environment created with a prefix using the same command used to activate environments created by name.
It is often a good idea to specify a path to a sub-directory of your project directory when creating an environment. Why?
- Makes it easy to tell if your project utilizes an isolated environment by including the environment as a sub-directory.
- Makes your project more self-contained as everything including the required software is contained in a single project directory.
An additional benefit of creating your project’s environment inside a
sub-directory is that you can then use the same name for all your
environments; if you keep all of your environments in your
~/miniconda3/env/ folder, you’ll have to give each of them
a different name.
Listing existing environments
Now that you have created a number of Conda environments on your
local machine you have probably forgotten the names of all of the
environments and exactly where they live. Fortunately, there is a
conda command to list all of your existing environments
together with their locations.
Listing the contents of an environment
In addition to forgetting names and locations of Conda environments,
at some point you will probably forget exactly what has been installed
in a particular Conda environment. Again, there is a conda
command for listing the contents on an environment. To list the contents
of the basic-scipy-env that you created above, run the
following command.
If you created your Conda environment using the --prefix
option to install packages into a particular directory, then you will
need to use that prefix in order for conda to locate the
environment on your machine.
Listing the contents of a particular environment.
List the packages installed in the machine-learning-env
environment that you created in a previous challenge.
You can list the packages and their versions installed in
machine-learning-env using the conda list
command as follows.
To list the packages and their versions installed in the active
environment leave off the --name or --prefix
option.
Deleting entire environments
Occasionally, you will want to delete an entire environment. Perhaps
you were experimenting with conda commands and you created
an environment you have no intention of using; perhaps you no longer
need an existing environment and just want to get rid of cruft on your
machine. Whatever the reason, the command to delete an environment is
the following.
If you wish to delete and environment that you created with a
--prefix option, then you will need to provide the prefix
again when removing the environment.
Delete an entire environment
Delete the entire “basic-scipy-env” environment.
In order to delete an entire environment you use the
conda remove command as follows.
This command will remove all packages from the named environment
before removing the environment itself. The use of the
--yes flag short-circuits the confirmation prompt (and
should be used with caution).